
BLANK ENVELOPE LABELS + BIBLE VERSE = DIY STICKERS
Blank envelope labels make excellent Bible verse stickers. Simply type your Bible verse as if it was an address and then print them out! How easy is that? Here are some extra tips to jazz them up…
*
*
*
HOW TO…
- Choose your envelope labels: Blank envelope labels come in various sizes per sheet. Buy them from your local stationery shop, and they may also come with some how-to instructions. I have worked with various sized envelope labels to make stickers – 14 labels per sheet, 33 labels per sheet, 65 labels per sheet. Experiment with what works best for you and choose the ones you want.
- Choose your Bible verse: The best part about making your own stickers is that you can type out your favourite Bible verses in your child’s own language. Type them in just like you would an address, or write your Bible verses directly onto the envelope labels.
- Decorate: Decorate your stickers by adding clip art, images, your child’s name, draw your own doodles… whatever you want. Get your children involved. They love designing their own stickers. Just give them a blank sheet of labels with your Bible verses on them and off they’ll go. And that’s all there is to it. Here’s a few tips of how I do mine…
*
*
*
SET UP YOUR TEMPLATE
1. Choose your envelope labels
For this tutorial, I chose 33 labels per A4 sheet. That will give me 3 stickers across the page and 11 rows down, which will give our children a decent sized sticker plus plenty of stickers to share around with family and friends. First, I set up a blank Excel document as a template document. This takes a bit of time, but once you have your template, you can just copy and paste it for next time.
*
2. Make sure your printer and your sticker page line up
To set up the template, I take out one blank sticker page out of the packet, measure it with a ruler, and set up an A4 Excel document to match. Set up your margins. Next, set up 3 large columns interspersed with smaller columns for the spaces between the cells; and set up the row height down your page. It will look a bit like this…

*
Insert a rectangle shape into the first large cell. Make sure it fits snugly into the cell. This will be the edge of your sticker, whether you actually use the border or not. It’s just for placing to make sure your stickers match up to your sticker paper when it prints. When you have it exact, colour the border, so when you do a test print you can see exactly where each cell prints and whether you need to do any adjustments to your template.

*
Copy and paste that rectangle throughout your page if you wish, but I just do mine across the top (3 large cells) and down the first column (11 cells down)… like so. If they are correct, the others will be, too. It is worth taking the time to make sure your template is set up correctly. When you print your stickers, you do not want any part of your masterpiece to overlap into other cells.

*
3. Test Print
Now print a test copy. This can be done on plain A4 paper if you don’t want to waste your sticker paper. Cut out the other blank columns, so you are left with an ‘L’ shaped piece of paper. Compare it to your blank sticker page and make sure all the cells line up exactly. This may take a bit of juggling, losing of hair(!) and a few test prints to get it right. Once it is perfect, you can delete all the text boxes unless you want borders, and save that document as your blank DIY sticker template.
*
*
*
*
NOW LET’S START MAKING STICKERS
1. To make your own stickers from scratch, make a copy of your original template document (optional) and open it up. Decide whether you would like one Bible verse or a few different Bible verses, a whole page of the same sticker or different stickers. If you are unsure, keep it simple to start with and just choose one sticker style and one Bible verse.
2. Insert a text box into the first cell [insert – text box] and type [or copy and paste] your Bible verse into it. Choose your text colours and the font you want.

*
3. Add clip art if you wish [insert – picture] to match your package theme. If you have no specific theme, just choose something your child will like. Maybe hearts, flowers, stars, animals, teddy bears, sports… whatever you want.

*
4. Optional: Add a border [insert – shape] if you wish. If you kept the original borders on your template document, choose your colour and thickness.

*
This is what your completed first sticker should look like. We have one Bible verse in one text box; one clip art image, and one border. All fitting snugly into the first cell. If we set up our template correctly, this is exactly how it should print.

*
Click out of the cell, then click back into it, to select the whole cell. Now copy [CTRL+C] that complete cell and paste [CTRL+V] into the other cells… OR… if you want different stickers in the other cells, repeat steps 1 to 4.

*
Check your masterpiece in print preview… then print. And that’s it!

*
*
*
*
MORE SAMPLES OF DIY STICKERS
Here are more samples that I did for my children using just one text box and one clip art inside each cell, changed to suit each child. These adorable teddy bears are from Grace at cutecolors.com (no longer active).

*
Here is a sports theme I did for my boys using 4 cool sports clip arts from MS Publisher, just alternating them.

*
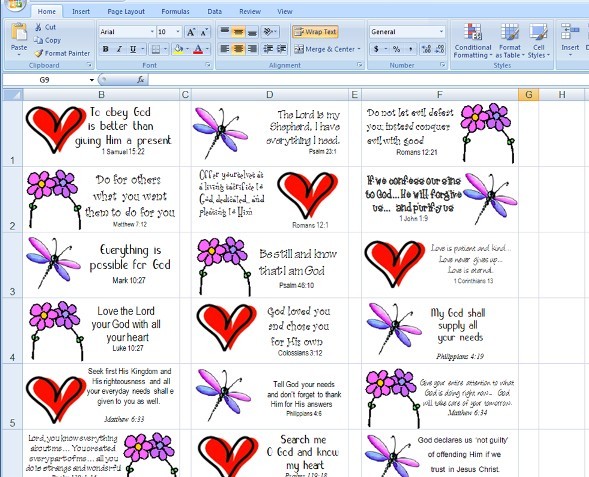
Here’s another one I did for my girls using girly fonts, hearts, dragonflies and flowers. Simple but beautiful.
*
These are fleuro stickers using just one coloured rectangle shape in each cell and one white text box sitting on top of it. And then the text was added over the top.

*
Here’s a closer look at the fleuro one. In this pic, I’ve pulled out one of the lime rectangles, so you can see it more clearly. The larger rectangle at the back is coloured lime. There’s a smaller box on top that is coloured white and set on top [set to front]. And your clear text box goes over both of them. If it helps, think of it just like shuffling bits of paper.

*
This one has a koala peeking over the rim (too cute), also from cutecolors.com, and word art with a slight shadow instead of a text box [insert – word art]. But it could also easily be done with a text box. I just like playing. :)

*
*
*
*
DECORATE
- If that looks a bit scary, just make your stickers by hand. Simply print a sheet of Bible verses as if they were addresses on your envelope labels… OR… simply write them in. Know calligraphy? Fabulous! Try that.
- Get out your coloured pens or watercolours and let your imagination play. Not sure what to do? Try a watercolour background wash around your Bible verse in your child’s favourite colour. Enjoy doodling? Make up your own clip art. Try some hearts, flowers, stars, animals, teddy bears, sports… etc. Match your package theme. It can be in colour; or black and white if your child likes colouring in.
- Add your child’s name. I have done personalised sticker pages for each of my sponsored children with their name on it, or alternate cells with Bible verses and their name, e.g. Jesus loves Estefany; Estefany; God loved Estefany and chose her for His own; Loved by God; Chosen One; etc.
- You might find it easier to draw your borders in after you’ve printed your stickers, if you want them. Will you choose a hand drawn doodle or use a ruler? Both look fabulous. Decorate your border with a few well placed tiny dots, stars, curly lines, flowers, etc.
- For something different, try making your own stickers or sticker decorations using clear contact paper. Simply draw your clip art on the shiny side, cut out and adhere. That would also make a great suncatcher or window cling.
- Blank envelope labels are also fantastic for children to make their own stickers. Kids love making stickers! They can choose their own Bible verses and design away to their heart’s content.
*
*
*
*
READY MADE STICKERS FOR KIDS ~ FREE PRINTABLE
If you are running short of time and want some readymade stickers, or are looking for more inspiration as to how to design yours, here are some readymade sticker sheets for kids that are free printable. Simply download them, print on full-sheet adhesive label paper from your local stationery store, then cut them out. You can also print your stickers on plain paper, then cut and paste them on. Add them to reward charts, stationery, notepaper, or wherever.
- DIY Bible Verse Stickers
DIY Bible verse stickers (graphicgarden) various labels in a sweet country style – animals, nature, teddy bears, berries; simply print them out and write your Bible verses in; 18 per page; free printable
DIY Bible verse stickers (avery) simply type in your Bible verse into this colourful abstract readymade address label, then press ‘preview and print’; 33 per page; free printable
Moroccan Tiles (worldlabel; scroll down to ‘use WL-875 address labels’) download and save the editable pdf in the colour you want, open it up, add your Bible verses and print; 30 per page; free printable
Floral | Watercolour (worldlabel) scroll to the end of the post, click on ‘printable labels’ in your choice of font to download the editable pdf. Each pdf has 3 pages with different sized labels on watercolour wash and floral backgrounds – 12, 36, 4 – choose the pages you want. Type in your Bible verses into the address labels, and print; free printable
DIY Bible verse stickers print some of these Bible wallet cards on full sheet sticker paper and turn them into instant stickers; most are roughly 8 or 9 per page; free printable
- Other Stickers
Stickersandcharts.com has 200+ different sticker sheets for children, with 30-40 stickers on each page. Check out these cute bugs, heart smiley faces, butterflies, dinosaurs. Their other categories include nature, animals, countries, flags, weather, holidays, alphabet, numbers, sports, transport, occupation; print on full sheet sticker paper and cut out; free printable
Butterfly – stickers | Sparkles | Asterisks | Stars | Hearts | Flowers | Botanic Dots | Patterned Boxes | Rounded Squares | Grids | Drops | Scribbles | Dots | Flags | Hexagons | Arrows | Solid Headers | Tinted Headers | Clipboard (aelyzecreates) small stickers in various pretty colour palettes; print on full sheet sticker paper and cut out; free printable
Safari Animals – stickers (lilshannie) print on a full sheet of sticker paper and cut out; free printable
- For purchase
WorldLabel | Avery label design inspiration, templates, and envelope labels for purchase.
*
*
*
*
*
RELATED LINKS
Make your own:
DIY Bible poster | postcard
DIY Bible bookmark
DIY Bible note cards | notepaper
DIY Bible wallet cards
DIY Board game
DIY Stationery
*
*
*
*
*
NOW IT’S YOUR TURN!
Have you ever made your own Bible verse stickers? How did they turn out? Love to hear your ideas…
*

*
*¨*•.ღ.•*¨*
Collect your FREE BONUS GIFTS when you sign up to follow me. What will they be? Click here to find out. If you like my work, please tell others and ‘like’ this page. Your kind comments make my day! You can also follow Paper Gifts for Estefany on…

*¨*•.ღ.•*¨*
*
*
*
*
*
******

Pingback: Tutorial – Jazz up your Colouring pages | Paper Gifts for Estefany
Pingback: Gift Ideas… how about something free printable? | Paper Gifts for Estefany
Pingback: DIY Activity Book for Kids (or adults) | Paper Gifts for Estefany
Pingback: Tutorial – Make your own Stationery | Paper Gifts for Estefany
Pingback: Free Printable Photo Frames (Part 1) | Paper Gifts for Estefany
Pingback: Tutorial ~ Make your own Note Cards | Paper Gifts for Estefany
Pingback: Jazz up your envelopes | Paper Gifts for Estefany
Pingback: Tutorial: Make your own Board Game for Kids | Paper Gifts for Estefany
This is awesome! I’m thinking name tags for all their stuff for camp! =)
LikeLike
Great idea! :)
LikeLike